Sweet Little Singer 348

The problem with having a vintage sewing machine obsession is that you tend to develop this completely irrational need to own ALL the vintage sewing machines ever made. All the good ones, anyway. Plus all the pretty ones. Plus the one that your mom had when you were growing up.

And it just. never. stops.

Before you know it, you own 50 vintage sewing machines. Some of them are duplicates because there is no way you are going to find a beautiful machine for a good price and pass it up because you already own one of the exact same model. See? The part of your brain that controls rational thought is completely stomped into submission by a vintage sewing machine obsession.

However, space restraints being what they are, I have decided that while I still want to own ALL the vintage sewing machines, I really don’t need TWO of each. So,  Upswing Vintage is transforming into a “Purveyor of Vintage Housewares, Fashion, Amusements and Sewing Machines.

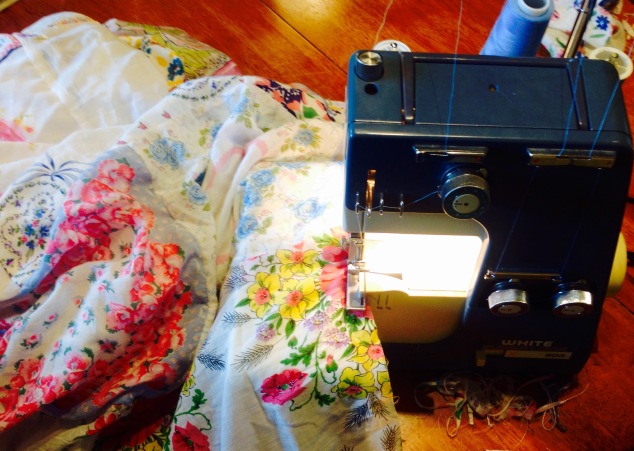
The first of many you will find in my Etsy shop is this beautiful blue Singer 348 from 1967-1968. I already own one, but I couldn’t pass up this lovely lady even though she was in a sad state when I found her. The motor ran, but the needle would not go up and down; plus, she was filthy inside and out.

DSC_0513

This is a post-cleaning picture. Isn’t she pretty?

In the course of giving her a good cleaning, I found the source of the problem with the needle: there was a very small clump of thread stuck in her bobbin case. The exact same problem has happened to me on my Featherweight, so I was not surprised to find that a tiny, 1.5″ long piece of thread had completely incapacitated the machine. I simply plucked it out and she was good to go.

Well, sort of. She ran, but it was sluggish. I opened up the top and bottom and spent a couple hours cleaning decades of dust, grease and general muck from her working parts. I then gave her new grease and oil and tested her out – she is ready to rock and roll once more.

I know that for the uninitiated, buying a vintage sewing machine online can be a frightening proposition. Will it work? Will I know how to thread it? Does it come with all the parts I need? And will it arrive in pieces because the seller doesn’t know how to pack properly?

Let’s answer that last question straight off: I will do everything I can to ensure it gets to you safely. I know all the best practices for shipping sewing machines, and follow them to the letter. I also know the pain of taking delivery of an improperly packed sewing machine – believe me, I know this pain intimately. In the past week alone, I’ve had three machines shipped to me – all three were significantly damaged by improper packing. Sigh.

For the other questions, I figured the best way to answer them is to simply show you the machine in action. So without further ado…


When I ship her off to her new home, I’ll put her foot pedal and power cord inside the bag for safekeeping.

DSC_0515

The manual for this machine can be found here.

If you have further questions about this machine, please contact me by sending me a convo at Upswing Vintage!

Vintage Quilt Repair With No Stress

I have a rather deep and enduring passion for vintage quilts. To me, they represent everything that is meaningful about vintage: beautiful to look at but practical at the same time; made to last for generations and not be tossed aside when a newer style emerges.

DSC_0009-001.JPG

But vintage quilts also appeal to me on a highly emotional level, as it is a direct connection to the woman who made it generations ago. I love to see the hand stitched binding. I like to find all the places where a quilt has been mended by hands that held a needle long before I was born. I smile at the uneven stitching, thinking perhaps it was done by someone in a hurry or who was perhaps new to sewing. I marvel when I see hand stitching so perfect it could be mistaken for machine done.

But most of all, I love the fabrics. I literally go weak in the knees when I see old feedsack quilts from the 1930s. The charming patterns and faded colors of vintage feedsack evoke a whole world for me, of fresh eggs, home baked bread, aprons and fresh air. And the feel of these quilts – ah, they are like magic! So soft and buttery from years of use. Who wouldn’t want to wrap themselves up in one?

With all this in mind, you may understand why I snap up ancient quilts that most people would pass right by without a second thought. I find quilts that are torn, stained, and well loved to the point of being abused. I actually prefer these timeworn quilts over the gorgeous museum pieces that are meant for display only. While they may be breathtaking to look at, I want to *use* my quilts and not just look at them; museum quality anything does not fit in with my cat-loving, child-rearing, creative-messy lifestyle.

So it was when I came across this quilt. This poor thing had seen better days, all of them eons ago. A short list of the problems:

DSC_0003

Huge amounts of seams had detached from their moorings

DSC_0009

The binding was completely worn away on all sides

DSC_0007

Good heavens. The less said about this the better.

DSC_0004

And there were stains. Many stains.

Most quilt restorers will tell you to do your repairs first, then clean it. I don’t do that. If I am going to have a quilt sitting in my lap for the better part of a week, I would prefer it to not smell like a barn, thank you very much.

So, the first thing I do is scrub out the bathtub, fill it with hot water, then add 1/2 cup of OxiClean and 1 tbsp of Orvus Quilt Soap. Then I let the quilt soak for about 4-6 hours.

DSC_0010

Don’t you just love the little holder for my eyeglasses in the background? That was my grandmother’s.

I then drain the water, rinse the quilt, gently squeeze out the excess water, and do it all over again. Often, the color of the water after the first soak is rather frightening; for that reason, I almost always soak it twice before I work on it.

DSC_0012

Rubber duckies optional

The next step is to dry it. The best way to do this is to lay several color-safe towels and/or blankets on your grass and spread your quilt out to dry, preferably not in direct sunlight. But I live in California. We used to have a lawn, but thanks to this ghastly, never-ending drought, we now have a dry, dusty patch of dirt which is not ideal for quilt drying purposes. So this is how I dry my quilts:

DSC_0016

On a collapsible wooden drying rack. Not ideal, but it gets the job done.

Once dry, I lay the quilt on the floor and mark all the problem spots with quilt binding clips.

DSC_0018

This picture is misleading: I think I used a whole package of clips!

Then I choose which machine I’m going to use to make the repairs. I own somewhere between 40 and 50 vintage sewing machines, and I love every single one of them. For this quilt, I used my Singer Rocketeer from the 1950s. How I LOVE this machine! Mine is missing the lid on top, but no matter. I got her for $20 at a thrift store, totally frozen and with wiring scary enough to make an electrician run away in horror. I replaced her wiring, cleaned and oiled her, and now she is a rockstar.

Anyway, I zig zagged over all the loose seams with white thread. And there were many. loose. seams. This took hours.

Then, I put various types of patches or “quilt band aids” on the many holes, tears and frayed fabric pieces that covered the quilt.

DSC_0050.JPG

The ghastly blue and yellow star from the picture above? I replaced that with modern fabric.

DSC_0051

If the holes were small, I covered them with vintage feedsack from my own collection

DSC_0027

Holes in the middle of a white fabric piece, I put in an embroidery hoop and darned on my Rocketeer

DSC_0030

All better!

There were a few problem spots that couldn’t be darned easily or covered up with fabric patches. For these, I used “quilt band aids”: twill tape that I have stamped with permanent fabric ink and heat set with a hot iron. Like so:

DSC_0049

This is a technique I often used to add a bit of pizzazz when I made clothing for my children. It adds a modern touch to the quilt, which I rather like.


Finally, I replace the binding. For this quilt, I used some modern fabric that I thought would go nicely with the feedsack. Unfortunately, when I cut away the bad binding on the scalloped edges, the scallops were no longer even due to the damage; I repaired it as best I could, but it still looks a bit wonky.

DSC_0037

Some of the new scallops are a bit pointier than the old…but it’s still an improvement!

Another note on binding: I don’t have the skill, the time, nor the patience to hand stitch binding. I always use a sewing machine to bind a quilt. It may not be as pretty as hand stitching, but it will last a lot longer. I use Cluck Cluck Sew’s machine binding tutorial and that totally works for me!

When all is said and done, we don’t have a museum piece, but rather a quilt that is ready to be used once more. Put it on a bed, wrap yourself up in it while watching a movie, take it to the beach, or use it for a picnic – it’s all good. And you don’t need to worry if your dog jumps on it, or if it becomes your toddler’s favorite blankie to snuggle in when his tummy is upset.

So no, it’s not museum quality: but it wasn’t meant to be. This quilt was meant to be used, not just admired. Enjoy it.

DSC_0003-001


A Parade of Cakes and Carriers

Given the enormous supply and diversity of vintage cake stands and carriers, it’s easy to imagine hordes of cake-carrying women crowding the sidewalks of 1952, elbowing each other out of the way with their delicious baked goods carefully ensconced in brightly colored tins.

DSC_0008-001

1950s Lincoln Beauty Ware Cake Carrier.

This phenomena – which I dearly want to believe was actually a thing – can probably be explained by the massive popularity of cake mixes that followed World War II. Although cake mixes had been around since the 1930s, they didn’t really take off until the big flour companies started marketing them as a convenience food for the busy, post-war world.

Now that cake-making was not such a time consuming chore, cakes could be enjoyed at parties and holiday gatherings, potlucks, or just as an after dinner treat. But if you signed up to bring a cake to your neighbor’s bridge party, you needed a way to transport your creation that would protect it from the elements but wouldn’t make a mess out of the frosting.

Enter the cake carrier, like the yellow Lincoln Beauty Ware example above. This one features a handled lid that locks on to the base, making transporting a breeze.

Even if you weren’t transporting cakes hither and yon, you still needed a way to serve and store your cakes, preferably as beautifully as possible. American captains of industry heard the call and responded valiantly by creating cake stands and keepers in a myriad of colors, patterns and designs.

DSC_0018-001

1937 Nesco cake keeper

Of course these were not used just for cakes: you could also store muffins, cookies, or any other baked goods that you wanted to keep safe from husbands, children, dogs, mice…whatever was roaming your home looking for tasty morsels.

My favorites are the tin cake platters decorated with decals, popular during the 1930s and 1940s, like the one above which features a lady doing a little flower pot gardening. Below is another cake saver I adore, available from one of my favorite Etsy vintage shops (no, not my own!):

il_570xn-711242443_eabr

1940s cake keeper from LuRuUniques on Etsy

And then, of course, there are the novelty cake stands of the 1950s. During that magical decade, marketers loved to add all sorts of gimmicks to their products. I was lucky enough to find a Heller Hostess Ware “Musicakes” stand, totally unused and still in the box. Not only does this marvelous contraption revolve, it also plays “Happy Birthday” for a truly festive occasion!

DSC_0108

This very cake stand was a 10th anniversary gift (the “Tin” anniversary – get it?) for a 1950s couple named Don and Mabel. 

Here’s a video I made of the “Musicakes” cake stand so you could see it doing its thing:

(Toward the end of this video, you may hear the wails of a small child in the background. That is my seven year old son who, as I discovered, was in distress because he could no longer get his Kindle to respond as apparently the screen “had boogers on it.” My apologies to those of you who are eating).

Note to self: in future, only make videos when children are at school.

And finally we come to the 1960s, which was not the end of cake keepers of course, but it does represent the newest, or rather, the “least vintage” of the cake stands I currently have in the shop. Made from clear acrylic, this one does double duty as both a lidded platter and a stand: take off the lid, turn it over, and the platter fits nicely on top, displaying your cake proudly for all to see.

DSC_0029-001

Lid as a lid and….

il_570xn-917043577_4j3n

….lid as a base. Very clever!

For some strange reason, I am now craving a cake with chocolate frosting. I think I may have a mix in the pantry……off to go look!

2 Years and 80 Vintage Hankies Later, We Now Have a Curtain

The closet doors in my house are the bane of my existence. They are frightfully heavy track door models that refuse to stay on their tracks, get stuck, and make us all pull our hair out in frustration. These doors have been the source of much salty language overheard in our house, I assure you. Honestly, is closet door technology really so difficult?

The doors in my daughter’s room were probably the worst. I don’t think she could even get into her closet for about 2 years, they were so badly stuck. In desperation, I had my husband take the darn things off for once and for all, and promised her I would replace them with some lovely vintage hankie curtains like the ones I always drool over on Pinterest.

It took rather a long time to get enough handkerchiefs to cover the thing, but I persevered. Much more difficult was finding the time to get the curtain actually sewn up – sadly, the days when I would sew for hours upon end, everyday and into the night have disappeared into the ether.

My daughter, who is ten and just starting to show the first signs of pre-teen snark, started to make little comments about the curtain, such as asking innocently whether it would be done before or after she leaves for college.

Luckily for her, I woke up the other day with a distinct itch to do something crafty, and decided it was now or never: this curtain was getting done come hell or high water.

Or kitties, as it turned out. My two fur babies were delighted with me for carefully laying out rows of vintage hankies for them to scamper about and wrestle upon.

IMG_0724

Ahhhh….so soft! I think I shall take a nap here.

My littlest kitty, the 3-month old Nuka, thinks that everything in the entire world must be attacked and conquered; in particular, long, flowy bits of delicate vintage hankies which clearly pose a threat to the health and well being of kittenkind.

DSC_0012

Must…..destroy…..vintage…..handkerchiefs!

Despite the over-enthusiastic attentions of my feline residents, I did manage to get the hankies stitched together.  Of the roughly 40-50 sewing machines I own, I chose my trusty 1951 Singer 15 for the job. Totally reliable, easy to thread and wind the bobbin, produces a nice stitch, and is a pleasure to listen to as she sews up a storm.

DSC_0006

Isn’t she lovely? I paid $20 for her at an auction. And yes, that is a centennial badge you see on her!

I really didn’t have any sort of a plan for this, just some rough idea of how big it should be. I just kept sewing hankies together until I had the dimensions I needed, which is why it looks a little wonky. If I took the time to plan it out properly, I can guarantee you I would never have finished it. Who has the time for carefully planned sewing projects?

DSC_0009

All stitched up, I then needed to decide whether or not to line it, and if so, with what: an old sheet, fabric, a vintage tablecloth? While I pondered, I pressed it, which sounds like a simple task, except that Nuka (aka: Chompy) thought that the dangling iron cord was an especially large mouse tail that needed to be attacked with much vigor. Scared she was going to bite through the cord and electrocute herself, I had to take many breaks to banish her from the room.

I finally opted not to have a lining. The thought of hemming yards and yards of tissue thin hankie fabric did not excite me either. I decided to pull out my vintage White Super Lock 503 serger (which really is not *that* old, 1980s maybe, but by serger standards, it’s ancient) and did a narrow overlock around the whole thing. I do have modern sergers – yes, plural – but I thought I should keep on with the vintage theme

(Added detail for fellow sewing nerds: I wanted to do a rolled hem, but to do so on a White Super Lock 503 is not just a matter of removing the stitch finger, as you would on a modern serger. Instead, you need to change the stitch plate. Alas, I got this machine for $10 at auction, and it did not come with the accessory box, inside which one would find the rolled hem stitch plate. Phooey.)

FullSizeRender

Isn’t she cute? I just love her blue and cream coloring. Plus, of my 4 sergers, she’s the easiest to thread.

Making this a truly quick and dirty project, I just folded down the top about 3 inches, stitched a line down it to create a casing, and threw it up on a tension rod.

And there we have it! Two years of collecting the 80+ hankies involved, plus about two days of sewing, and my daughter finally has something to cover up her closet. She is thrilled, and I no longer feel like a bad mother for putting this off for so long!

DSC_0026

It goes nicely with her vintage fan collection, don’t you think?

Vintage Valentines: A Collection Begins

Lately, I have been quite busy going through my vast inventory of vintage treasure to find items to stock for Valentine’s Day (romantics, take note! It’s coming up quickly!). Heart shaped items, bright red fashion pieces, romantic sheet music, even an antique book of Tennyson’s poetry are all available in the Valentine’s Day section of Upswing Vintage.

And of course there are the cards. I have quite a few in my store, the oldest of which date to the 1930s. I also recently acquired a huge amount of cards – valentines and otherwise – from the estate of a woman who apparently worked for the Gump’s card department back in the 1980s. I have vast amounts of very high end greeting cards like this that were sold at this legendary San Francisco department store 30 years ago, all in unused, mint condition.

Perhaps my favorite thing I’ve listed so far is this book of 1950s push-out Valentines for children. There is not one inch of this item that is not adorable. From the little girl with the flocked dress on the cover (who is actually a push out valentine herself), to the cut and fold envelopes decorated with red and blue heart stick figures, to the tiny “kissing stamps” – it is enough to make you swoon with the cuteness of it all.

DSC_0001-002

DSC_0005-002

While I am quite proud of the Valentine’s Day cards offered in my shop, I must admit I am not listing all that I have in my possession. I adore vintage greeting cards of all kinds, but these little tokens of love are a particular favorite. I must admit, I tend to hoard them for myself when I find them, but I thought I’d share some of my favorites with you here.

DSC_0001-003

Above are some of the first vintage Valentine’s Day cards I acquired. These are all from different decades, with the most recent being from the 1940s or so. And the oldest? That one up at the top looking all Victorian – because it is.

DSC_0002-003

This purple flowery heart Valentine is from none other than Raphael Tuck and Sons, the company which featured prominently in my last blog post. This gorgeous die cut valentine dates to the 1870s-1880s – isn’t it exquisite? The one next to it actually stands up, a style that was very popular from about 1895 to 1915.

Many months ago, I came across three large scrapbooks from the late 1960s and early 1970s, all completely filled with greeting cards. The woman who made these scrapbooks lovingly pasted every card she received from her husband, her parents, her children and her friends in these books. I have spent hours pouring over them, reading the birthday wishes from friends, the Get Well sentiments after she had surgery, and the vast numbers of Christmas cards she received.

But my favorite are the ones she gave to her husband, and those he gave to her. This couple gave each other cards for every single occasion: birthday, anniversaries, and Valentine’s Day of course, but also Easter and New Year’s Day. I am quite certain I have never given my husband a card for Easter, let alone New Year’s.

Here are some of the Valentine’s Day cards they gave to each other. This couple, particularly “the hubby” as he signed himself, tended to favor the humorous cards. She was a bit more lovey dovey. Together, I’m sure they were perfectly balanced!


DSC_0022-002

Nuka was quite intrigued by this one

Finally, we come to a love affair that really touched me. The man who gave his beloved these cards clearly adored her. The cards came to me along with numerous other documents from their life, giving me a tiny glimpse into their world.

But the cards! They span three decades of their life together, from the early 1950s to the mid 1970s. Each one has a succinct, but very heartfelt note from him. The fact that she kept them with all her important papers gives me hope that she cherished him just as much.

DSC_0017-002

Is it voyeuristic to look into the lives of couples from long ago through the valentines they gave? Perhaps. But I prefer to think that I am preserving a bit of the love they shared. As they say, true love never dies.

More to see on vintage Valentine’s Day cards:

A Flowering of Affection: Victorian Valentine Cards at the Lilly Library

Video featuring a wonderful collection of cards, including the first mail posted valentine on record, dating to 1806

A Child’s Love Of Books

As a child, my nose was often found buried in a book. Painfully quiet and shy, I found it easier to engage with the characters in my stories rather than the real life world around me; thus, a lifelong love affair with books began.

DSC_0001-002

Me on my 4th birthday in 1975. I look pretty happy with my presents, don’t I?

Fueling this passion was my mother, who would read to me when I was little, calling upon all of her dramatic powers to make the stories come to life. Her face would morph into the various expressions displayed by the characters on the page; her voice would be powerful, energetic, or ridiculous as appropriate. But my favorite part would be when she read something funny; she would fall right out of character and become mom again, and just laugh and laugh and laugh.

I still love listening to my mother read stories, to my own children these days – it brings me right back to those times when we would cuddle on the couch and get lost in stories together.

With this as a background, you can probably see why I am helpless when it comes to vintage children’s books. I see one and I just go weak in the knees with nostalgia. Serious book collectors often don’t like inscriptions as they prefer their acquisitions to be pristine, but that’s the first thing I look for in a clearly beloved children’s book.

DSC_0001-001.JPG

It’s hard to see but someone, probably mother, wrote the date 1911 next to the inscription by Aunt Alice.

The inscription is what gives me a direct link to the long ago hands that touched this book. I like to think about little Jerome opening his Christmas present and finding the gorgeously illustrated “Dolly at the Seaside ABC” inside, a gift from his favorite Aunt Alice. Perhaps Jerome and his mother would laugh at the line, “I is for Ink which trickles and runs upon the floor / Naughty little kittie upset it with her paw” as they thought about their own mischievous kitten.

And we can go even further with our imaginings. Perhaps Aunt Alice chose this book because she was enamored with the Victorian postcards of Raphael Tuck and Sons, the Dolly book’s publisher. She probably had no idea that those postcards, and in fact anything produced by Raphael Tuck and Sons, would become hugely collectible 100 years later.

two_thousand_pounds

Image courtesy of Tuck DB

You see, Raphael Tuck and Sons were so highly regarded that Queen Victoria awarded the firm the “Royal Warrant of Appointment” in 1893. During Victoria’s lifetime, all of their books were printed with the line, “Art Publishers to Her Majesty the Queen.”

This singular success allowed Raphael Tuck and Sons to open many offices around the world, so popular were their postcards and books world wide. They opened their new London headquarters in 1899, in a building that came to be called “Raphael House.” Its five floors housed every department of the business, from the delightfully named “Birthday Book Department” to the technical “Chromo, Oleograph, and Art Study Department.”

DSC_0147

Wild animals galore in “Father Tuck’s Noah’s Ark”, circa 1910s

On the night of December 20th, 1940 the unthinkable happened: London was ferociously bombed by the Nazis and many buildings, including Raphael House, were utterly destroyed. Imagine it: 74 years of the company’s records and 40,000 original illustrations and photographs by some of the best artists of the day were gone in an instant. It turns the stomach, does it not?

The company did survive this tragedy, although it combined forces with two other firms in 1959 under a new name.

It is with all these things in mind that I find myself incredibly fortunate to be able to present to you not only “Dolly at the Seaside,” but also Father Tuck’s Noah’s Ark at Upswing Vintage. Beyond the stories and the beautiful illustrations, it is easy to be captivated by the history of the firm that published them.

DSC_0253

Perhaps your own wee readers would be just as delighted with the pictures as little Jerome undoubtedly was, that Christmas Day back in 1911.

DSC_0143

For further reading about Raphael Tuck and Sons, please see the Wikipedia entry on the company. To view an absolutely incredible collection of postcards and books published by the company, I encourage you to visit the marvelous TuckDB site.

An intro, of sorts

Upswing Vintage is now almost a year old. I had thought this blog would be as well, but here I am writing my first post. Ah well. I’ve spent the past ten months madly zooming about California on the hunt for vintage treasure of all sorts; there has not been time for blog writing.

But then something happened yesterday that I took as a sign that my blog needed to finally find its way into the world. I was creating a listing for a 100 year old book I have called “A Message to Garcia.” I did an awful lot of research into this little book – really more of a pamphlet, including reading the thing cover to cover.

DSC_0295

I also spent a lot of time stroking that soft suede cover

I found the backstory of the book utterly fascinating, and spent an inordinate amount of time trying to figure out what would prompt the author, a Mr. Elbert Hubbard (b. 1856) to create such a hysterical rant about the laziness of American workers.

Having come up with some interesting nuggets, I started to summarize it all into a listing, so that the customer would understand what made this work so important.

Unfortunately, I had to leave the house before I finished the listing as my two sweet kitties needed a trip to the vet. When I returned, my computer had frozen, necessitating a restart. My work was lost. (You can not save draft listings on Etsy until all the little boxes are filled out….which I hadn’t done, sadly).

After pouting about this mishap for awhile, I realized that perhaps the listing description was not exactly the best forum in which to present my findings. Customers tend not to read long-winded descriptions of an item, do they? But a blog – I can drone on about a subject as much as I like!

So, here I am, having received a swift kick in the rear to get this thing going. I’ll be posting every few weeks or so, with interesting research I’ve dug up about my vintage finds, lots of pictures and maybe even a video or two of my vintage treasures in action.

Stay tuned!